Saturday, July 31, 2010

Mellow Bakers - French Bread


So I waited for the last possible day to post this last Mellow Bakers Challenge I was able to complete.  It has been such an insane summer, I am suprised how busy I became.  I was happy I tried to make this.  Though it is not the most complicated recipe it is one that I was most eager to try.  French bread brings me back to my childhood.  When we would go grocery shopping, The Mother would always look for the freshly baked french bread.  She was so excited when we found them warm from the bakery.  The bread would never last to make it home.  We would instantly attack the warm crusty bread.  The Mother would create a tunnel, she has always loved the soft inside of the bread while I always preferred the crust.  Between the two of us, we could put away 1/2 of the bread within the first 10 minute.  I got excited to try this recipe.  I was quite surprised that it was a straight dough.  I would think that you would need to bloom the yeast first.  The recipe was good but I think I could add some honey to add a little sweetness.


Friday, July 30, 2010

Hamburger Helper Remake


Growing up, I was very limited to what I was able to eat (stupid allergies). Most parents wouldn’t want their children to eat a lot of process foods but my parents didn’t have a choice. I was allergic to pretty much everything. Thankfully I got over almost all my allergies except for the occasional seafood or strawberry (I know, it sucks) reaction. I had a lot of mac and cheese, spam, and hamburger helper as a child. As I was asking The Husband what he wanted for dinner, he mentioned hamburger helper (both of us tend to have taste buds of a 5-year old). I thought to myself, why not make it from scratch at least there will be real cheese instead of the powder stuff. It was a big hit in my house :D.


My rendition of hamburger helper
1 Tbl of Flour
3 Tbl of Butter
1 Box of Pasta of Your Choice (I used Mostacolli)
1 Lb of Cheddar Cheese Shredded
1 Lb of Mozzerella Cheese Shredded
1 Cup of Parmasean Cheese
1 Lb of Ground Beef
1 Onion Diced
1 Garlic Minced
Salt and Pepper to Taste

Directions 
  1. Cook the pasta until becomes al dente.
  2. In a large skillet cook the onion and garlic in a little butter
  3. When the onions become translucent, add the ground beef and season to taste.
  4. In another large pot, add the flour and the rest of the butter to create a roux.
  5. When the mixture is fully incorporated, add the cream into the pot and mix well..
  6. When the cream comes to a boil, add the shredded cheeses one type at a time while continually whisking.
  7. When all the cheese is completely melted, add the ground beef and pasta. Completely coat both with the cheese mixture.
  8. Serve.

Wednesday, July 28, 2010

Kitchen Bootcamp - Papaya Salad with Honey-Lemon Dressing


This month's Kitchen Bootcamp theme is Salads and Salad Dressing.  In chapter 30 of The Professional Chef . It covers various methods of making vinaigrette and mayo based dressings. Not to mention a compulation of different salads.  If I have to eat a salad (it doesn't happen too much) I always try to dress it up.  A couple of weeks ago, I found a great selection of papaya.  With my track record, I bought it and hoped that I will use it.  I decided to incorporated it into a salad.  I went with a simple salad of Romain lettuce, onions, cucumber, and papaya.  The dressing I used was simple but  I believed it truly highlights the flavors of the salad.  

Honey-Lemon Dressing
1 Cup of Good Olive Oil
4 Tbs of Lemon Juice
1/2 Cup of Honey
Salt and Pepper to taste
*I like dressing sweeter so I added more honey but you could also do a 1:1 ratio.  

Directions
  1. Pour the olive oil into a small bowl.
  2. Add the lemon juice and fully incorporated.
  3. Drizzle in the honey and than add the salt and pepper.
  4. Pour over the salad and fully mix the salad.


This dressing is very versatile and I use it quite often in other recipes.  

Monday, July 26, 2010

Mellow Bakers - Bialys

Mellow Bakers- Bialys
Like always, I wait for the last possible second to complete the different challenges I am in.  I vow that one day I will not be rushed to make a deadline and I will completely all three of the breads.  Unfortunately, this month I was only able to complete two of the three breads challenge.  My first attempt was bialys.  For those that doesn't know this type, it is a bagel except for a tougher exterior.   The bread is quite chewy and traditionally topped with onions.  This receipt comes from page 262 from the book Jeffrey Hamelman's book Bread: A Baker's Book of Techniques and Recipes.  The book stated that the dough starts off stiff but I was amazed how stiff it was.  I was slightly scared that I messed up the dough but I knew I had to finish the recipe.  If I made a mistake, I would be able to track down my error.  Though I did make one mistake and I did not prep the onions first.  I should have started the onion filling the day before so it would marinate nicely with the bread flour.  The onions was still a little hard for my taste.  I did opted for sweet onions but I would probably make a garlic version next time.  I have heard quite a few people stating that this was similar to a bagel but I soon realized why.  The texture was nice and chewy.  I may try to make this instead of bagels (especially with my history with bagels).  


Wednesday, July 21, 2010

Pastry Boot Camp Recap

Here are the recipes requested to be shared. 

Trissa
.
Pain a la Biere - Beer Bread
(Adapted from the French Pastry School)
480 g of Water
500 g of Bread Flour
250 g of Rye Flour
17.5 g of Sea Salt
8.7 g of Dry Yeast
625 of Fermented Dough (similar to a sourdough starter)
55 g of Potato Flakes (yes potato flakes)
195 g of Water

Directions
  1. Use a 20-quart mixer with a dough hook, combine the bread flour, salt, yeast, fermented dough, and rye flour. 
  2. While that mixes, mix together the potato flakes and water until it is well mixed.
  3. Add the potato to the dough mixture.
  4. Slowly add water if needed.
  5. Mix the mixture on low for 5 minutes, than go to medium for 2-3 minutes to create the glutton.
  6. Let the dough rise for an hour.
  7. Once it rises, portion into 350 g pieces and shape into loaves.
  8. Brush the dough with the beer mixture (see below).
  9. Once they are all covered with the beer mixture, lightly dust with rye flour.
  10. Let it proof again for an hour.
  11. Cook at 495F for about 25 minutes. 
Beer Mixture
100 g of Rye Flour
180 g of Beer (pick a good one)
5 G of Salt
2.5 g of Yeast

Directions
  1. Mix all the ingredients together.
  2. Set aside.

Brioche
Poolish
50 g of Whole Milk
5 g of Sugar
60 g of Bread Flour

Dough
Poolish
340 g of Bread Flour
8 g of Fleur de Sel or (Salt if you don't have this)
35 g of Sugar
220 g of Whole Eggs
200 G of Cold Unsalted Butter

Directions

  1. In the mixing bowl, pour the milk, than the yeast, sugar, and on top the flour.  Let the yeast proof.

  2. When the flour breaks, add the rest of the ingredients except for the butter.

  3. When the dough comes together, slowly add the butter.  Do not over add too much but wait until it is almost fully incorporated before adding more.

  4. Place in a bowl and cover with saran wrap.

  5. Let is rise for an hour and punch down to remove the air.

  6. Place in the fridge for 2 hours and than punch down again to remove the air.

  7. Let it sit in the fridge overnight for the final rise. 

  8. Form into loaves or desired shape and brush with egg wash.

  9. Let it proof again for an hour.

  10. Brush more egg wash and cook at 400F for about 15-20 minutes.


Oggi
Passion - Apricot Pate de Fruit
(Adapted from The French Pastry School)
125 g of Passion Fruit Puree
125 g of Apricot Puree
7.6 of Apple Pectin
29.75 g of Sugar
264.5 g of Sugar (there is two different sets needed)
53.75 g of Glucose or Corn Syrup
2.25 g of Tartaric Acid Solution
4.25 g of Kirsch

Directions
  1. Cook the purees to 104F over a stove top.
  2. Add the pectin and sucrose and bring to a boil by stirring continuously.
  3. Add the glucose
  4. Slowly add the sugar.  Once it reaches 223F, remove from the heat.
  5. Add the tartaric acid and the kirsch.
  6. Pour the mixture into a 1/2 sheet pan lined with parchment paper and a little oil.
  7. Once it is set, cut and cover with sugar.
I can't wait to see your take on these recipes.

Tuesday, July 20, 2010

Pantry Clean Out Challenge Week 4

I know I have been slacking on my self-inflicted challenge but it has been an insane couple of weeks.  Let's recap on our last episode, I am currently up 4 points.  For this challenge, I actually have extra weeks to work on these ingredients but I did not use all the ingredients.  

Week 3 ingredients:
Dried Figs - I did make fig jam +1
Semolina Flour - I did not use it -1
Whole wheat spaghetti - I made spaghetti with my version of eggplant parm+1
Coconut - Coconut sponge cake with a mango mouse +1
Imitation cream cheese - I cheated and used this for a cream cheese frosting +1

Total: +7

Week 4 Ingredients
Semolina Flour
Can of Cranberries
Vienna Sausage (we always have a stock of this stuff)
Tempura Batter
Chocolate Chips


Spaghetti with meatballs and eggplant parm


Coconut sponge cake with mango mousse

Sunday, July 18, 2010

July's Kulinary Cooking Club - Ginataan

This month's theme was ginataan, this was hosted by Anthea and Asha.  There are so many takes on ginataan, savory and sweet.  Ginataan is any dish made of coconut milk.  With my sweet tooth, I went with a sweet dish. 

Ginataan with Bilo Bilo and Sweet Potatoes
Ingredients
1 Sweet Potato Chopped in 1/2 Inch Chunks
2-3 Plantains Bananas in 1/2 Inch Slices
Bilo Bilo (Recipe Below)
2 Cans of Coconut Milk
1 Cup of Sugar
2 Cups of Water
Tapioca (I wish we had some, but we didn't :( )

Directions
  1. Create a simple syrup with sugar and water in a medium stock pot.
  2. Once the simple syrup is brought to a boil, add the coconut milk.
  3. When the mixture begins to boil, add the sweet potato. 
  4. While the sweet potatoes are cooking, cook the tapioca by directed
  5. Cook until it becomes tender and add the banana.
  6. Add the bilo bilo and the tapioca. 
  7. When the bilo bilo rises, it is cooked.
  8. Serve.
Bilo bilo
1 box of Mochiko
Water to texture

Directions
  1. Pour the mochiko into a large bowl
  2. Slowly add water until it becomes a thick paste
  3. Rolling into 1/2 inch balls

Kulinarya was started by a group of Filipino bloggers living in Sydney, who are passionate about the Filipino culture and its cuisines. Each month we will showcase a new dish along with their family recipes. By sharing these recipes, we hope you find the same passion and love for Filipino Food as we do.
If you are interested in joining our Kulinarya Cooking Club, please feel free to stop by our food blog and leave a comment - we would love to hear from you. 


The current members are:
Trish - Sugarlace
Trissa - Trissalicious
Olive - Home Cooking and Baking
Caroline - When Adobo Met Feijoada
Althea - Busog Sarap
Cherrie – Sweet Cherrie Pie
Acdee - Confession Nook
Valerie – A Canadian Foodie
Sheryl – Crispy Waffle
Divina – Sense and Serendipity
Anna - Second Helpings
Dahlia - Energetic Chef
Maribel – foodgeek's diary
Tressa
Jen - Jen at Work
Malaka – The Grand International
Mimi – La Pinche Cocinera
Erika – The Ivory Hut
Kat – Table Talk

Friday, July 16, 2010

Baked Pancakes topped with Blueberries (Sort of a Misadventure)


So today's post is a misadventure just because I can't find the recipe I used.  You know when you are cooking, especially when you are making up new recipes, you tend to forget to write down the recipe?  I tell myself I will write it down or create a post sooner than later, but it just doesn't happen. These pictures are actually a couple months old and I meant to post them but never had the chance until today.  And when I went to look for the recipe in my Google docs, I could not find it.  I apologize for that.  As soon as I find it, I will post the recipe.

These are the ingredients I remember using:
Melted butter
Whole wheat flour
Brown sugar
Eggs
Maybe Baking Powder.

Directions
  1. Pre-heat the oven @350F
  2. Mix all the ingredients in a blender until combined.
  3. Coat a 10 inch skillet with the melted butter.
  4. Pour the batter into the skillet, pop into the oven, and bake for about 30 minutes until golden brown.


The pancake had a cake-like texture.  

I do remember the blueberry compote I used :D  

Blueberry Compote
(adapted from Epicurious)
2 1/2 Cup of Frozen Blueberries, thawed.  Fresh works too.
1/3 Cup of Sugar
1/3 Cup of Water

Directions
  1. Combine all the ingredients except for 1 cup of the blueberries in a medium saucepan.
  2. Cook over medium heat until it starts to boil and reduce to a low heat to simmer.  Stir often.
  3. Add the other cup of blueberries 10 minutes into the simmer process.
  4. When the sauce coats the spoon, about 8 minutes, you're done! Serve warm.


I wish I remembered the recipe.  I want some.
The Daughter couldn't wait to dig in.  BTW, the bangs were the result of The Mother, who wanted to cut her hair.  She is not allowed to be by The Daughter with scissors anymore.  

Tuesday, July 13, 2010

Daring Cooks Another First

Another first for me.  I finally got a chance to participate in the Daring Cooks Challenge.  This month's theme was chosen by Margie of More Please and Natashya of Living in the Kitchen with Puppies.  The topic of choice was Nut Butters.  Not peanut butter but nut butter.  Our mission if we chose to accept it was to make a nut butter and incorporate the mixture into a savory dish.  I have a natural sweet tooth so I immediately thought of a dessert, but I had to remind myself that I needed to make a savory dish.  I started to rummage through my freezer and I found hazelnuts.  Immediately, I started on the hazelnut butter.  I had the salted-roasted kind so I added a little sugar to satisfy my sweet tooth. 

Hazelnut Butter
2 Cups of Hazelnuts
Sugar to taste

Directions
  1. Grind the hazelnuts in a food processor until it because a paste.
  2. Add the sugar to taste while the food processor is running.
I'm sure you are wondering what I made with the hazelnut butter.  Well, I stared at my little jar of hazelnut for days until last week, when I just pulled out a random bag of meat from my freezer.  When I got home, I realized I pulled out stew meat.  A little light bulb in my head...kabobs. 

Hazelnut Beef Kabob
1 Lbs of Stew Meat
3 Tbs of Hazelnut Butter (from the recipe above)
2 Tbs of Olive Oil
Salt and Pepper to Taste

Directions
  1. Slice the stew meat into small cubes.
  2. Mix the meat with the hazelnut butter, olive oil, salt, and pepper.
  3. Let it sit for at least an hour to over night in the refrigerator.
  4. Skewer the meat and place on the grill.
  5. Cook for about 10-15 minutes depending on how large are the pieces.
  6. Serve
When we made it, I was slightly scared how it would taste.  I didn't know if the hazelnut would make the beef taste weird.  I was pleasantly surprised how good it was.  The sugar in the hazelnut gave the meat a nice caramelized crust.  I would totally make this again. 

Monday, July 12, 2010

Pastry Boot Camp Continued

One minute I was walking into the kitchen with a book full of recipes to try and the next thing I knew it was Friday and my book was filled with notes and tips (and food stains).   I was exhausted but it was a great experience.  I completely forgot how bad commuting to the city was.  I learned so much and I'm already planning to attend another boot camp.  I may take a chocolate class or even another cake decorating class.  So many to choose from :D.  We covered so much and I wish the class was not coming to an end.  Here are some more pictures of my classes. 
My partner in crime Anna

Pate de Fruit
Brioche

Blueberry Muffin with Streusel topping

Beer Bread

Chocolate Financiers

If there is any recipes you would like, please let me know. 

Wednesday, July 7, 2010

June Kitchen Bootcamp

For this month, the kitchen boot camp theme is yeast breads.  If you are a follower of my blog, I tend to have a strained relationship with breads, especially yeast breads.  Sometimes it just works beautifully and there are times that it just hates me.  When Jen presented this recipe, the first thing I thought of was milk bread.  For those who don't know what milk bread is, it's very similar to a regular white bread with a very smooth and soft texture.  The first time I had this type of bread was in a Japanese grocery store.  I just called it "Japanese bread" and it took me a while to find a recipe.  I found a bunch of recipes and one of them I wanted to explore was from Corner Cafe

Japanese-Style White Bread Loaf (Milk Bread)
(Adapted from Corner Cafe)
350 Grams of Bread Flour
1 Tbl of Milk Powder
30 Grams of Sugar
5 Grams of Salt
7 Grams of Instant Dry Yeast
150 mL Lukewarm Water
30 Grams of Butter, Cubed

Water-Roux Paste (also referred as Tangzhong)
20 Grams of Bread Flour
100 mL Water

Directions
  1. First, mix the bread flour and water to create the roux in a small saucepan and cook at a medium heat. 
  2. Once the roux forms, remove from the heat and let it cool to room temperature.
  3. Sift together the bread flour, milk powder, sugar, and salt into a large KitchenAid mixing bowl.
  4. Add the yeast and mix well on medium speed. 
  5. Add the roux to the dry ingredients.
  6. Once it is well incorporated, slowly add the water until the dough forms a slightly sticky and soft dough.
  7. Remove from the mixer and knead the dough by hand until it is smooth and elastic.  During the kneading process, throw the dough onto the work surface a few times to remove the air. 
  8. Than knead in the butter until it is well incorporated. 
  9. Let it proof in a greased bowl for about an hour.
  10. When the dough doubles in size, punch out the air and than divide it into 5 equal portions.
  11. Form into balls and let them rest for 15 minutes.
  12. Prep 23 cm x 10 cm x 10 cm pan, I used a Pullman pan. 
  13. When the dough has properly rested, form it into 30 cm logs and place into the prepared bread pan.
  14. Let it rise again about an hour. 
  15. Cook the bread at 350F for about 25-30 minutes until it is a golden brown.


Tuesday, July 6, 2010

So Guess What I’m doing This Week

So Guess What I'm doing This Week

I took a week long vacation from the 9-5 grind and I'm not actually leaving town.  Here are some hints to what I'm up to.  I have been so excited to post this but I have been too tired. I'm sure you will understand when you hear it.
 
Hint 1: I am going back into a classroom.

Hint 2: I will be with my friend Anna.

Hint 3: I won't be getting any sun and I will be on my feet the whole time.


No idea?  I am attending a Pastry Boot Camp for the whole week.  Jealous?  I'm sure you are.  I will be going to the The French Pastry School  in downtown Chicago.

The course is packed with breads, cakes, tarts, candy, and even ice cream, all in one week.  My class started on the 5th so while everybody was sleeping in, I was on a train at 6 o'clock in the morning wanting another cup of coffee.  It was a great first day, my notebook was filled with notes and factoids.  The only bad part of that day was the lack of air conditioning.  It was 90 degrees outside so just imagine how hot it was inside.  Due to the heat, we mainly prepped for other recipes.  We did get a chance to bake one thing and cook a few others things.  At the end of the day, I was tired but still full of energy.  I can't wait to see what the week will bring.  Here are some pictures of adventure.

Our Kitchen

Here is what I made on the first day.  


I didn't bring my camera into the classroom so I didn't have pictures of the inside, but I will post some later.  It is going to be a fun week.  

Friday, July 2, 2010

What Could Have Been


As some of you know, I performed my first Daring Bakers Challenge.  I was suppose to participate in Daring Cooks but I wasn't able to fit it in my "busy" schedule.  But since I already had all of the ingredients, might as well make something else.  The original dish was a vegetarian pate and when I evaluated all of the ingredients I had, I was able to majority of the ingredients in a stuffed shell dish.
 
Stuffed shells
Ingredients
1 Can of Cannellini (I had it for the pate)
2 Cups of Ricotta Cheese
1 Lb of Ground Beef
1 Jar of Tomato sauce
1 Jar of Roasted Red Peppers Chopped
1 Cloves of Garlic Minced
1 Onion Diced
Italian Parsley Chopped
Basil Chopped
Pine nuts
Mozzarella Cheese
Box of Large Pasta Shells
 
Directions
  1. First saute the onion and garlic in a large skillet.
  2. When the onions become translucent, add the ground beef.
  3. When it is fully cooked, set it aside to cool a little.
  4. While you are waiting for the meat to cool, mix the rest of the ingredients except for the tomato sauce, the pine nuts, mozzarella cheese.
  5. Mix in the ground beef with the cheese mixture.
  6. Take the mixture and start stuffing the shells.  Place the shells in a casserole dish to bake.
  7. Once you are completed stuffing the shells, top with the tomato sauce and mozzarella cheese.
  8. While is it is baking, take the pine nuts and toast them lightly in a small skillet.
  9. Once the cheese is nice and gooey, top the whole casserole dish with the toasted pine nuts. 
  10. Serve!

Thursday, July 1, 2010

Siopao, Siopao, and more Siopao

So the other day my aunt called me asking if I could make her and her friends some siopao.  For those who don't know what siopao is, it is a steamed bun usually filled with a meat mixture, but I also make a vegetarian version.  The Chinese counterpart is called Bao.  This is something that I make quite often and I would do anything for my aunt, so I said yes.  This time around, I had to make 6 dozen and it normally takes me a full day (or two half days) tom make that many.  They wanted bola bola for the filling, so I started with that.  For those who don't know what that is, it is a meatball, any type of meat you like, with a piece of Chinese sausage and a slice of hard boiled egg, all covered in a sweet sauce made with soy sauce, vinegar, and brown sugar.  Unfortunately, I can't share my dough recipe with you, but I wanted to share the technique.  I'm also very excited to tell you that I actually took pictures, which I kept forgetting to do before.

How to construct a Siopao

Materials
Very strong mixer, unless you have the strength to do this by hand.  If you do, please tell me your secret :D
Filling - Any kind will work, I made Bola bola
Dough produced by the strong mixer
Wax paper or just regular paper cut in squares
Steamer - bamboo or metal. I have a metal one because the bamboo one scare me.  With my luck, it will catch on fire. 
Cooling rack, you don't want soggy bottoms :D

Procedure
 This is a whole bowl of yeast that I'm proofing.  I should have taken a picture of it next to my kitchen aid so you could judge on how much I made, but I forgot :D
I had to use this bad boy this time.  Complements of The Mother.  BTW I didn't take the picture crooked.  The table holding the mixer is a little off (The Father made it, and The Husband just shakes his head at it)

There was about 36 cups of flour in the bowl.
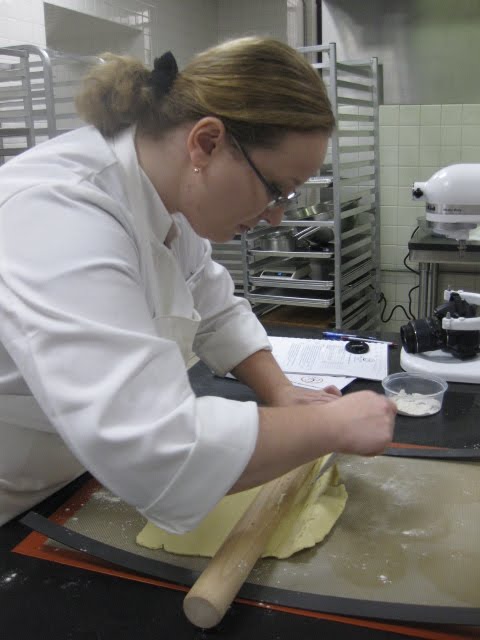
Take the mixed dough and divide it into little balls. Doing this allows the dough to proof, but do not let it proof too long since you need to still knead the dough.
Take one of the dough balls and roll out a little disc with a little hill in the middle.  Place your choice of filling and bring up the sides to make a little ball.
Once you bring up the sides, pinch the bottom to seal the bun and place the sealed end on the wax paper.
Prep the steam bath with lots of water and a little vinegar (the vinegar will assist in keeping the dough white).  Bring to a boil over medium heat. 
Place a tray of buns on top of the boiling water and cook for about 8-10 minutes, depending on the amount of buns and how large the steamer is.  You may need to adjust the heat and time a little to get the desired result.  It takes a lot of practice.
Once done, place on a cooking rack.  I told you I made a lot of them. 
 
It more or less looks like this except with meat balls. Unfortunately, I don't have a picture of that  :D