

Showing posts with label Cookies/Chips. Show all posts
Showing posts with label Cookies/Chips. Show all posts
Wednesday, December 12, 2012


Monday, September 17, 2012
Thursday, December 15, 2011

Monday, December 12, 2011

Thursday, September 22, 2011

Friday, May 20, 2011

Tuesday, April 19, 2011

Monday, December 13, 2010
2nd day of Christmas, My True Love gave to me…..
2 Dozen Pecan Roll Cookies and a partridge in a pear tree. I know that was corny but I couldn’t help it. What is a perfect Christmas gift other than cookies? Since I suck at cookies, this time I used a recipe instead of making it up. When I was baking it, I thought it would look different so I didn’t know it was cooked until it actually browned more. I thought the cookies would spread a little more and it would flatten into a circle, I was wrong but it was still as good. I made these for a cookie exchange I was hosting (more pictures to come). This is a recipe I’m repeating.
Pecan Roll Cookies
Cookie Dough
(adapted the black berry jam sandwich cookie dough recipe from Nick Malgieri: The Modern Baker)
2 Sticks of Unsalted Butter, Soften
1/2 Cup of Sugar
2 Tsp. of Vanilla Extract
2 Large Egg Yolks
3 Cups of AP Flour
* 2 Tsp. of Cinnamon (in the recipe, it said lemon extract)
Filling
1/4 Cup of Brown Sugar
1 Tb of Cinnamon
1/8 Cup of Chopped Pecans
Directions
- Cream the butter and sugar together until it is well incorporated.
- Add the vanilla and cinnamon.
- Slowly add the eggs, one yolk at a time.
- Slowly add the flour until it is forms a ball.
- Wrap the dough in saran wrap and refrigerate over night.
- When the dough is chilled, roll out the dough until it is about 1/4 inch thick. I would shape it in a large rectangle.
- Sprinkle the brown sugar until it covers all of the dough while leaving 1/2 inch on the edges.
- Than sprinkle the cinnamon and pecans.
- Take the edge of the cookie dough and roll it up like you would a cinnamon roll.
- Wrap it again in saran wrap and let it chill for an 1/2 an hour.
- Slice and bake at 350 for 20-30 minutes.
- Serve
I wanted to put a frosting but I actually didn’t have a chance to. I didn’t realized I made a short bread as the cookie base.


Monday, October 11, 2010
12 Weeks of Christmas Cookies – Apple Crisp Cookies

I have always had a Love-Hate relationship with cookies. This one is frustration. I don’t know why but every time I make drop cookies, it becomes very flat and it spreads way too much. I can’t get what I did wrong! I even put it in the refrigerator for almost an hour. It still came out flat! The taste is exactly what I was trying and it came out nice and soft :D.
Apple Crisp Cookies
(By ME)
1 Cup of Soften Butter
1 Cup of Brown Sugar
1/2 Cup of Sugar
2 Eggs
3 Cups of Flour
1 Tsp of Baking Soda
1 Tsp of Cinnamon
1 Tsp of Nutmeg
1 Large Granny Smith Apple – Diced
Crumble (See below)
Directions
- Cream the butter and both sugars until it is fully incorporated.
- Add the the eggs. The texture should be slightly soupy.
- Add the baking soda and than the flour slowly. You may need to add more flour if it still really wet.
- Add the cinnamon, nutmeg, and apple slices.
- Place it in the fridge for at least 30 minutes to set.
- Scope out 1/2 inch balls and place on a prepared cookie sheet about 2 inches apart.
- Sprinkle the crumble mixture on top.
- Bake at 350F for about 15-20 minutes.
- Let it cool and serve.
Crumble Topping
1 Cup of Flour
1 Cup of Oatmeal
1/2 Cup of Sugar
1/4 Cup of Soften Butter
Directions
- First mix together all the dry ingredients.
- Add the butter and mix together until it creates clumps. I used my hand.
- Set aside.

Wednesday, October 6, 2010
12 Weeks of Christmas Cookies – Week 1

I don’t believe Christmas is so close. I swear it was just the beginning of summer! April at Abby’s Sweets is hosting this wonderful challenge called 12 Weeks of Christmas cookies. Instead of 12 days, we are counting the weeks before Christmas. Check out the other recipes here.
Basic Peanut Butter Cookie
(Adapted from Simple Recipes)
1/2 Cup of Sugar
1/2 Cup of Brown Sugar
1/2 Cup of Butter – Room Temp
1/2 Cup of Peanut Butter
1 Egg
1 1/4 Cup of Flour
3/4 Tsp of Baking Soda
1/2 Tsp of Baking Powder
1/4 tsp of Salt
*my Add – 2 Cups of Semi sweet chocolate chips
Directions
- Pre-heat the oven to 350F
- Whip the sugars and butter together until it becomes cream.
- Add the peanut butter and egg until it is completely incorporated.
- While that is mixing, shift together the flour, baking soda, baking powder, and salt.
- Slowly add it to the wet ingredients.
- When that is fully mixed, slowly fold in the chocolate chips.
- Place the bowl in the fridge for at least and hour to chill.
- Once it is chilled, scoop out 1 inch balls and place on a baking sheet, 2 inches apart.
- Bake for about 15 minutes.


Friday, September 17, 2010
Happy Birthdays and more Macarons

Have you ever notice there are certain times during the year that I call a “Birthday Season”? This happens when there is quite a few birthdays around the same time. In my family it starts in August and it goes until December. Most of my nieces and nephews were born after August but there is a few of them in April and June but not too many. Today is my my nephew’s, whose nick name is Rolo, and aunt’s birthday.
My aunt is The Mother’s sister. They are so close in age, you could consider them twins. They even look alike. My little cousin used to get confused which one was his mom. Even recently one of my other cousins thought my aunt was The Mother. I have an old pictures of the two of them. I’ll update this if I am able to find it. It is a picture of my lovely aunt and The Mother. They look so much alike, it is slightly scary. You just knew which one was The Mother by her lack of a smile. Hopefully she won’t get mad if she reads this :D Sorry mom.
The other birthday is my nephew. He is THREE. How did that happen?!?! It was just yesterday when my cousin went into labor. He looks exactly like his mom but built like his dad. Lucky kid :D He is also the only boy with my last name which is a huge deal. He will be the one carrying on our name unless The Brother decides to have kids. Hint hint.
Unfortunately, I am unable to celebrate with both of them but they are in my thoughts. I do get to see my nephew with the rest of The Father’s side. Being Filipino, I feel weird if I don’t bring something. I had some left over egg whites just waiting to be made into macarons. So I made a chocolate macaron with a coffee butter cream.
I have been doing my own twist to macarons. Instead of almond flour, I have been making cashew flour. I know it is not traditional but I like the saltiness it gives to the little cookies. I know I’m strange.
Chocolate Macarons with a Coffee Butter cream
(inspired by Cristina, from Buenos Aires to Paris)
Part 1
85g of Egg Whites
228g of Sugar
69g of Water
1g of Salt
Part 2
85g of Egg Whites – Aged for a couple of days
228g of Cashew flour (or finely grounded cashews)
228g of Confectionary Sugar
10g of Cocoa Powder
* I love this recipe since all the measurements are the same :D.
Directions
- Let the egg whites sit to room temp.
- Once the egg whites is at room temp, please one of the sets in the mixing bowl with the salt.
- Place the water and sugar into a small sauce pan and bring to a boil. Let it go to a soft ball state. I would have a temp but my thermometer broke so I have been guessing (do not do this). I waited until it comes a little darker in color. Again, use a good thermometer.
- While that is cooking away, start whipping the first set of egg whites. Start on low and gradually go to medium. You need to achieve a nice foam stage.
- When the simple syrup is at the right temp, add it to the egg whites.
- Gradually increase the speed of the mixer until it is on high but do not go immediately to high.
- Whip the eggs until it reaches the almost stiff peak stage.
- While that is whipping, take the confectionary sugar, cashew flour, and cocoa powder and place it in the food processor. This allows the mixture to be fully incorporated.
- When the egg whites is at the soft peak stage, add the 2nd set of egg whites into the nut mixture. Make sure it is fully incorporated.
- When the stiff peak stage is achieved, slowly fold in the nut mixture.
- When everything is incorporated, you could see if the being stages of a ribbon stage is achieved. This is when the batter flows like a ribbon but you don’t want it to be too loose or it will spread quite a bit. I generally move part of the mixture and if it goes back the the original position slowly, it is ready.
- Place the batter into a prepared piping bag. I just cut the end and place part of the coupler. I don’t actually use a tip.
- Pipe out quarter size circles.
- Let it sit for about 1-2 hours or until it is dry to touch.
- Pre-heat the oven to 310F with a baking sheet. I use a double baking sheet to achieve the famous feet.
- I bake for 15 minutes and allow it to fully cool.
- Assemble.
Butter Cream
1 Cup of Sugar
1/2 Cup of Water
2 Tbl of Corn Syrup
3 Eggs
1 Lb of Butter in 1/2 inch cubes
1 Pinch of salt
1/8 cup of Warm Water with 1 Teaspoon of Instant Coffee
Directions
- Make the simple syrup by bring the water, sugar, and corn syrup to a boil.
- While that is boiling, take the eggs and salt and place it in the mixing bowl. Begin whipping the egg until it because foamy at a medium speed.
- The simple sugar should be at a soft ball stage when added to the eggs.
- Add the simple syrup to the eggs and increase the speed slowly to high.
- Continue whipping the eggs until it is doubles in size and reduces in temp.
- Turn off the mixer until the bowl goes into room temp.
- When the mixture has cooled completely, add the butter slowly.
- Add the coffee and water mixture.
- Let the butter cream to whip until it is to the desired consistency.
- Place in a piping bag with a star (or any) tip.
To Assemble
- Match up the macarons to the corresponding size. I don’t know why, I like this part.
- Pipe out the filling and place the other cookie on the filling
- Place in the fridge to sit for at least a day.
- Serve
I also made maja blanca since my nephew is allergic to as many things as The Daughter. That is coming in another post :D.


Tuesday, August 3, 2010
My Current Obession - Macarons

If you have read my blog before, I get a bit obsessive with recipes. Especially those that do not come out the way I want them. I am known to try a recipe numerous times until I get it right (my pan de sal). This time it is French Macaroons. French Macarrons has always intimidate me and I have always told myself I was going to try to make some. During my pastry boot camp, we was given the opportunity to make them.


Looks nice right? It even has feet!
I finally saw the appeal of them (I had yet to try a good one). So I set out to make my own version. I picked a recipe that has taken may tries to get right, San Rival. I worked on that recipe for about a year until I got it just right.


My first attempt, it came out more like merginue cookies
After 4 attempts, I got it right. I went with a standard french marcaron recipe but instead of almond flour, I used a cashew flour. I also made a french butter cream (just egg yolks).


Look there is a small foot

Looks good huh?
Thursday, March 25, 2010
Cream Puffs
I always thought cream puffs and eclairs are so hard. I was probably scared of using the piping bag. Now I'm obsessed with using it now. I have been practicing my cake decorating. BTW you can't over whip butter cream. I keep the process is similar to bread making which I am very aware how long to mix the ingredients to prevent a hard bread. Anyway, I'm sorry I switch topics. I do that in person too. So I made this also for my book club. My husband requested this actually. Here is the recipe I got from the Food Addicts blog.
(adapted from the Food Addicts)
Ingredients
(Pastry Dough - Pâte à Chou)
- 1 1/4 cups water
- 1 1/2 sticks (3/4 cup) unsalted butter, cut into pieces
- 1/2 tsp salt
- 1 1/2 cups unbleached flour
- 5 large eggs
Ingredients
(Nutella Pastry Cream)
- 16 oz. milk
- 1/4 of vanilla bean, cut and scraped out
- 3 1/2 oz. sugar, granulated
- 4 egg yolks
- 3 1/2 tbsp cornstarch
- 1 tbsp butter, unsalted
- 1 tbsp Nutella
Directions
1. Pre-heat oven to 375-degrees. 

2. In a saucepan, bring water to a boil with butter and salt over high heat.
3. Reduce heat to moderate and add flour and mix well until mixture pulls away from sides, forming a dough.
4. Transfer dough to a mixer and beat in the eggs, 1 at a time on high speed. Batter should be a stiff, but soft, consistency. (Easy to pipe)
5. Pipe the mixture onto a greased cookie sheet (or silicone mat), about 1.5 inch wide for each cream puff.
6. Bake for 20-25 minutes until golden brown and let cool. *I forgot to time it.
7. For pastry cream, place milk in saucepan and pour in sugar.
8. Add vanilla and bring mixture to a scald. *I used liquid vanilla because I didn't have the vanilla bean
9. Whisk egg yolks and cornstarch and temper in the hot milk. *BTW I got a bit messy from this.
10. Add back to scalded milk mixture.
11. Heat over medium heat until cornstarch taste is gone and begins to boil.
12. Strain over butter and pour into shell or chill in ice bath at 40F. (This will help the cream get thick.) *I add nutella after I turned of the heat because I wasn't sure when to add it.
13. Transfer the cream to a piping bag and pipe into each puffed pastry from the middle center, at one of the nooks. *I went from the bottom because I didn't realized that I left a hole
This is lemon filled This is Nutella filled
I got it pretty close but The Husband said the cream tasted like cheese. I have no idea how that happened and I'm not asking. Than again, his response when I ask him how my pan de sal recipe tasted, he said it tasted like bread.
Monday, December 7, 2009
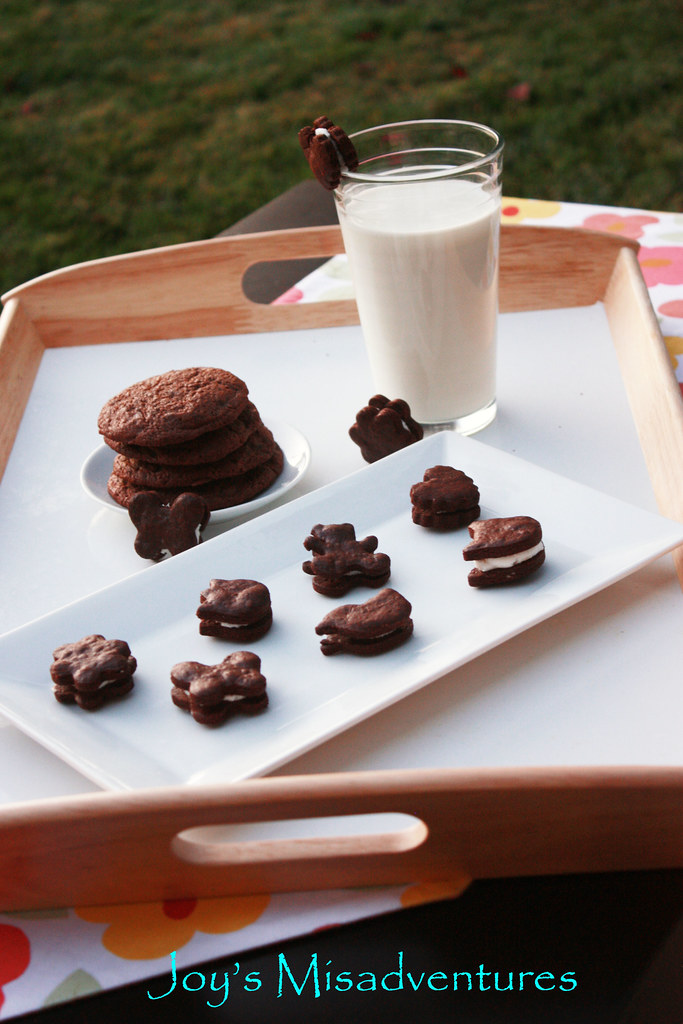
Homemade Oreos
For the Dough:
2 cups all-purpose flour
½ cup Dutch-process cocoa powder (I used hersey)
½ teaspoon baking powder
½ teaspoon salt
2 sticks (8 ounces) unsalted butter, softened
¾ cup granulated sugar
1 large egg yolk
1 teaspoon pure vanilla extract
For the Filling:
½ stick (2 ounces) unsalted butter, at room temperature
¼ cup vegetable shortening
2 cups sifted confectioners’ sugar
2 teaspoons vanilla extract
½ stick (2 ounces) unsalted butter, at room temperature
¼ cup vegetable shortening
2 cups sifted confectioners’ sugar
2 teaspoons vanilla extract
Garnish: Decorative sugar (optional)
2. Beat butter and sugar with an electric mixer until pale and fluffy, then beat in yolk and vanilla. At low speed, mix in flour mixture in 3 batches just until a dough forms. Divide dough in half and form each piece into a 6-inch square, then chill, wrapped in plastic wrap, until firm, 2 to 3 hour or overnight.
1. 2.
2. 3.
3. 4.
4. 5.
5.
4. Roll out 1 piece of dough between sheets of parchment paper or saran wrap into a 14×10-inch rectangle (1/8-inch thick). Place the dough into the freezer until dough is firm, about 10 minutes. Repeat with remaining dough.
5. Cut out as many rounds as possible from first chilled square with a 2-inch fluted or round cutter, reserving and chilling scraps, then quickly transfer cookies to a buttered baking sheet, arranging them ½ inch apart. (If dough becomes too soft, return to freezer until firm.)
6. Sprinkle half of cookies with decorative sugar (if using), then bake cookies until baked through and slightly puffed, 10 to 12 minutes. Cool on sheet on rack for 5 minutes, then transfer to rack to cool completely (cookies will crisp as they cool).
8. To make the filling, beat the butter and shortening together at medium speed until combined and smooth. Reduce the speed to low and gradually beat in the sugar and vanilla. Increase the speed to high and beat for 2 to 3 minutes until the filling is light and fluffy.
9. To assemble the cookies, pipe a heaping teaspoon of filling onto the flat side of the plain cookies. Top with the sugared cookies to make sandwiches. Store in an airtight container at room temperature.
Wednesday, October 21, 2009
Cinnamon Sugar chips
This is probably simplest snack that is eaten all up once I finished making it. My mom told me to eat this during my pregnancy instead of eating chips and candy to keep my blood sugar up. Since than everybody at the hostel (family members than to comes and goes quite a bit) asks me to make some.
Ingredients (the measurements is up to your taste)
Flour tortillas
Sugar
Cinnamon
Water
Directions
1. Mix the sugar and cinnamon together, I generally start with a cup of sugar and pour enough cinnamon to cover the top of the bowl of sugar.
2. Cut each tortilla to the desired size. I generally get 4 – 8 out of one regular size tortilla.
3. Brush water on each piece


Ingredients (the measurements is up to your taste)
Flour tortillas
Sugar
Cinnamon
Water
Directions
1. Mix the sugar and cinnamon together, I generally start with a cup of sugar and pour enough cinnamon to cover the top of the bowl of sugar.
2. Cut each tortilla to the desired size. I generally get 4 – 8 out of one regular size tortilla.
3. Brush water on each piece

4. Sprinkle the cinnamon sugar on top

5. Bake at 350 for 10-15 minutes
6. Make sure you remove right away to avoid the chips sticking to the pan
* Repeat steps 3 and 4 if you want both sides coated.

Julia loves this stuff, she wouldn't let go of the chip

Subscribe to:
Posts (Atom)